Need help? We're here!
(888) 312-8812 Login SignupSteps to Replacing the Air Brake Chamber
FE
FinditParts Editorial Team
November 02, 2020
Air brake system issues can have significant violation and safety consequences for trucking companies and drivers. Too often, however, even the most effective preventive maintenance procedures are not enough to offset those problems.
Early signs of failing brake chambers often go unnoticed. The issue may start in one of the internal springs that has been worn out due to repeated use. The remaining brakes will continue to work normally, so this problem can remain undetected until it gets severe enough to cause brake chamber breakdowns.
Depending on the operating environment and whether the truck is often used or not, the air chambers’ life expectancy is from two to four years. When it’s time for a new truck air chamber, below are the steps to help you pull the task off:
Selecting a new air chamber
When choosing a new air brake chamber, it is best to go for an exact replacement of the original. Brake chambers come in different sizes; they are identified via a number corresponding to their diaphragm size. They are further categorized into standard and long strokes. A long-stroke chamber can be recognized through its square air-hose ports. New long-stroke units also come with a small tag with the letters LS.
While getting a replacement with a different stroke length than that of the OEM unit may not cause an evident problem after installation, there will be a difference in application force, resulting in braking performance issues over time. Pushrod failure can also occur.
Those working on a drum brake system should first determine the size of the slack adjuster used in the brake assembly. It’s also vital to ensure that the mounting bracket holes match the slack length and the chamber mounting holes.
Preparing the truck or semi-trailer
When dealing with your truck’s brake chambers, make sure to keep yourself safe. The main spring coiled inside the secondary chamber stores enough force to injure or remove body parts once it is released by accident. While the manufacturers have already sealed the most dangerous parts of their products since the 1980s, it won’t hurt if you still exercise caution. Avoid using acetylene torches, welders, and large hammers when servicing your truck’s air chamber.
It will be more convenient on your part if you park the truck or trailer on a level surface before chocking the wheels and engaging the parking brakes. It is also advisable to empty the primary and secondary air tanks before working on the brake assembly. If the spring brake chamber now has structural damage, do not uncage the spring right away. Take note of the bolt and port locations and positioning first, as it will help facilitate the installation process.
Taking out the old brake chamber
With a standard ¾-inch wrench, take the chamber caging tool off the side of the brake chamber. Remove the plug from the backside of the chamber. Make sure to position the caging tool into the brake chamber’s back, pushing it in as far as it can go. Rotate the caging tool clockwise until it latches into a groove. Check if you’ve correctly inserted the caging tool by pulling it out. The tool must not move when pulled. Using the same wrench, place the nut into the caging tool and tighten it until it stops.
Release the slack adjuster by pulling the cotter pins out of clevis pins at the end of the chamber rod. There are two mounting nuts securing the brake chamber to the bracket on the axle. Remove these nuts using a 15/16-inch wrench or a ratchet and socket. Rotate the cage tool counterclockwise and pull it out.
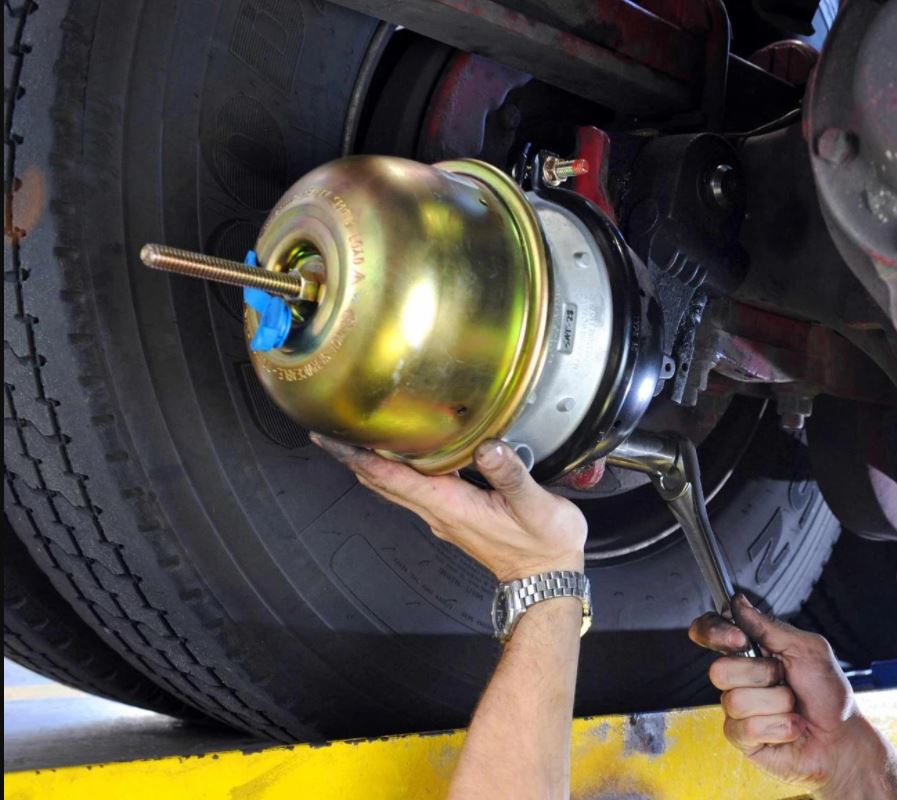
Installing the new brake chamber
Once the old chamber is out, clean the mounting surfaces, making sure they are undamaged. Check if the new chamber’s power spring is caged to ensure it will not put any pressure on the pushrod during installation. Thankfully, many chamber manufacturers nowadays have their chambers shipped already caged, but it is still wise to double-check before installation.
Position the new chamber to the bracket and secure it in place with the mounting hardware. Even if the old mounting hardware still looks good, always use the hardware that comes with the new chamber. Torque the nuts to 144 ±11 ft./lbs.
For drum brakes, it is required to adjust the slack straight into the pushrod clevis and align the large clevis pinholes to allow some up-and-down movement, if needed, when inserting the clevis pin. After positioning the large pin, re-engage the link by pushing up on the bottom of the small adjuster link and backing off the slack. Position the small clevis pin holes on the link and put the small pin. Back the adjuster off to bring down the adjusting rod and line it up to position the small pin.
Position the large and small clevis pins using the appropriate washers and secure them with cotter pins. Using pliers, don’t forget to bend the “ears” on every cotter pin and prevent accidental slippage. Adjust the brakes to the proper specifications depending on the chamber size.
Hooking up the airline and clocking the chamber
Once the chamber port is in the proper position, it’s time to link the chamber to the air supply. Hookup the air line, establish the connection and then pressurize the chamber. Check for leaks in the fittings using a soapy water mixture. If you’re sure that the lines are leak-free, discharge the air from the chamber and set the brakes to the right stroke.
This step is necessary if the chamber port isn’t in the right position to accept the airline. Clocking the spring brake chamber means rotating into a proper position. This involves prying the pushrod at the applied position using a pry bar. Then, clamp a vise grip onto the pushrod at the bottom of the chamber. Loosen the clamp by slackening the service-side clamp bolts on the chamber cover. Turn the chamber cover so the air supply line connects with the port and fits snugly without stretching or kinking the hose. Then, double-check the alignment of the hose before securing it.
Secure the cover and diaphragm in their proper position over the chamber base. Reinstall the clamp while making sure there’s a good seal around, without overexposing one side of the diaphragm. Tighten the clamp evenly by alternating the process between the top and bottom bolts. Torque them to 25 ±5 ft./lbs.
Attach the airline to the fitting and put on service pressure so the pushrod will come loose. Release the vise grips and spray soapy water mix around the band clamp and hose fittings to check for leaks. Release the pressure. For a drum brake, you will need to return the slack adjuster to the released position.
Protecting equipment and drivers with properly functioning air brake chambers means correctly identifying component problems and making repairs effectively. A key to success is to find the new air brake chamber and that’s where FinditParts has you covered with a large selection to fit almost every application.
Find it at FinditParts: With our vast number of sources and enhanced visibility into the inventory of distributors and manufacturers of OEM and aftermarket brands, you’re only a few clicks away from the parts you need. Need help? Our focus on service and support provides you with a repository of valuable information, customer facing technology including advanced cross reference capabilities, and technical specialists who assist in identifying and finding parts.
Related Reading:
Making Effective Reman and Built Parts Choices
https://www.finditparts.com/blog/making-effective-reman-and-built-parts-choices
How Air Brakes Work
https://www.finditparts.com/blog/how-air-brakes-work
Finding The Right Part Is As Easy As PIES
https://www.finditparts.com/blog/finding-the-right-part-is-as-easy-as-pies
Connect With Us